Git Diff Files Only
Git diff is a command-line tool that allows users to view the changes made between two versions of a file or a set of files. It provides a convenient way to analyze and understand the differences in code or content. By comparing different versions, developers can track changes, identify bugs, and collaborate effectively with team members.
Basic Syntax for Git Diff
The basic syntax for using the git diff command is as follows:
“`
git diff [options] [commit] [commit] [–] [path]…
“`
Here, the options are used to customize the output format, and the commits represent different versions of the repository. The `–` (double dash) is used to separate options from the path names.
Using Git Diff to Compare Two Files
To compare two specific files in Git, you can use the following command:
“`
git diff file1 file2
“`
This command will display the differences between `file1` and `file2`, highlighting the changes made within each file.
Using Git Diff to Compare Branches
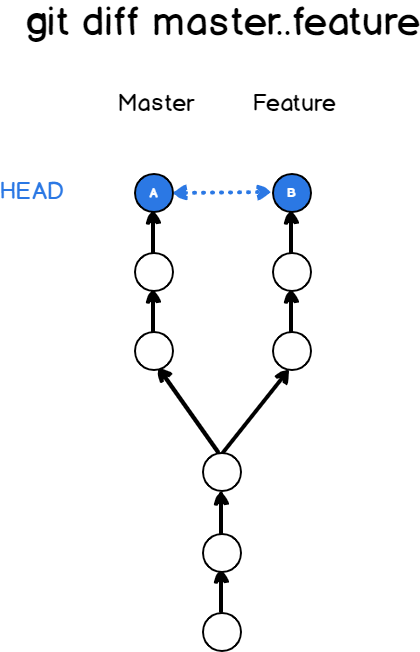
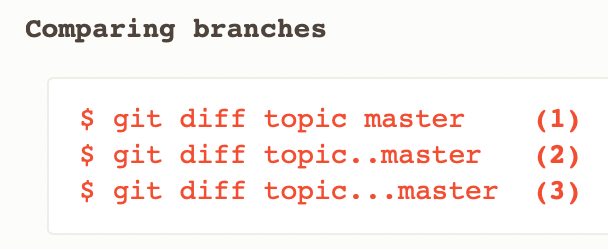
Comparing branches is a common use case in Git. You can use the following command to compare two branches:
“`
git diff branch1..branch2
“`
This command compares the changes between `branch1` and `branch2`, showing the differences in the files that exist in both branches.
Using Git Diff to Compare Commits
To compare two different commits, you can use the following command:
“`
git diff commit1 commit2
“`
This command displays the changes made between `commit1` and `commit2`, providing a detailed overview of the differences in the files.
Using Git Diff to Compare Tags
Comparing tags is another useful feature of Git diff. You can use the following command to compare two tags:
“`
git diff tag1 tag2
“`
This command shows the differences between `tag1` and `tag2`, allowing you to analyze the changes made in the files associated with each tag.
Comparing Specific File or Directory with Git Diff
If you want to compare specific files or directories, you can provide their paths as arguments to the `git diff` command. For example:
“`
git diff path/to/file
“`
This command displays the changes made to the specific file.
Ignoring White Spaces in Git Diff
Sometimes, it is useful to ignore white space changes while comparing files. You can use the following command to accomplish this:
“`
git diff -w
“`
The `-w` option tells Git to ignore any white space changes in the files, providing a cleaner and more focused diff.
Applying Git Diff Output to Another Branch
To apply the changes shown by the `git diff` command on another branch, you can use the `git apply` command. Here’s an example:
“`
git diff branch1..branch2 > changes.patch
git checkout another-branch
git apply changes.patch
“`
This sequence of commands first creates a patch file with the differences between `branch1` and `branch2`. Then, it applies the changes from the patch file to `another-branch`.
Customizing Git Diff Output
Git diff offers several options to customize the output format. Some commonly used options include:
– `–name-only`: Displays only the names of the files that have changed.
– `–stat`: Shows statistics about the changes made, including the number of insertions and deletions.
– `–color`: Highlights the changes using colored text for better visibility.
– `–word-diff`: Displays changes at a word level, providing a more granular analysis.
FAQs
Q: What is Git diff file command used for?
A: The `git diff file` command is used to view the changes made in a specific file.
Q: What is a git diff patch?
A: A git diff patch is a file that contains the differences between two versions of a file or a set of files. It can be used to apply the changes to another branch or share the modifications with others.
Q: Can you provide an example of using git diff?
A: Sure! A common example of using `git diff` is to compare the changes made in the current branch with the changes in the previous commit. You can use the command `git diff HEAD~1` to achieve this.
Q: What does git diff –name-only do?
A: The `git diff –name-only` command displays only the names of the files that have changed, without showing the actual differences in the content.
Q: How can I compare two different branches using git diff?
A: To compare two different branches, you can use the command `git diff branch1..branch2`, where `branch1` and `branch2` are the names of the branches you want to compare.
Q: What is the meaning of git diff commit?
A: `git diff commit` is used to compare the changes made in a specific commit with the current version of the files. It provides an overview of the modifications introduced by that commit.
Q: What does “git diff là gì” mean?
A: “git diff là gì” is a Vietnamese phrase that translates to “what is git diff” in English. It refers to the general understanding and usage of the git diff command.
In conclusion, Git diff is a powerful command-line tool that allows developers to analyze and understand the differences in code or content. Whether comparing files, branches, commits, or tags, Git diff provides detailed insights into the changes made. By applying the knowledge shared in this article, you can effectively utilize Git diff to enhance your development workflow and collaboration with fellow team members.
Part 4 | Git Tutorial | Git Commands | Compare Files Using Git Diff Command
How To Check Which Files Are Different In Git?
When working with Git, it’s important to keep track of the changes made to files in your repository. Git provides several ways to examine and identify the differences between files. In this article, we will explore different methods to check which files have been modified, added, or deleted in your Git repository.
Git Diff Command:
The most common way to compare file changes in Git is by using the “git diff” command. This command allows you to see the differences between the working directory and the staging area. To use this command, simply open your terminal and navigate to your Git repository.
To compare the changes in all files, type “git diff” and press enter. Git will display a list of modified files along with the added and deleted lines in each file. You can also specify a particular file or directory by typing “git diff
Git Status Command:
Another useful command to check file changes in Git is “git status”. This command provides a summary of the current status of your repository, including any modified, added, or deleted files. To use this command, open your terminal in the repository and type “git status” followed by the enter key.
Git status will display the status of all files in your repository. The modified files will be listed under the “Changes not staged for commit” section, the added files will be listed under the “Changes to be committed” section, and the deleted files will be listed under the “Changes not staged for commit” section.
Git Log Command:
The “git log” command can also help you identify which files have been modified. This command shows the commit history of your repository, including the files that were changed in each commit. To execute this command, open your terminal in the repository and type “git log” followed by the enter key.
Git log will display a list of commits, including the commit message, author, timestamp, and the changed files. By checking the commit history, you can determine which files were modified and when those modifications occurred.
External Tools:
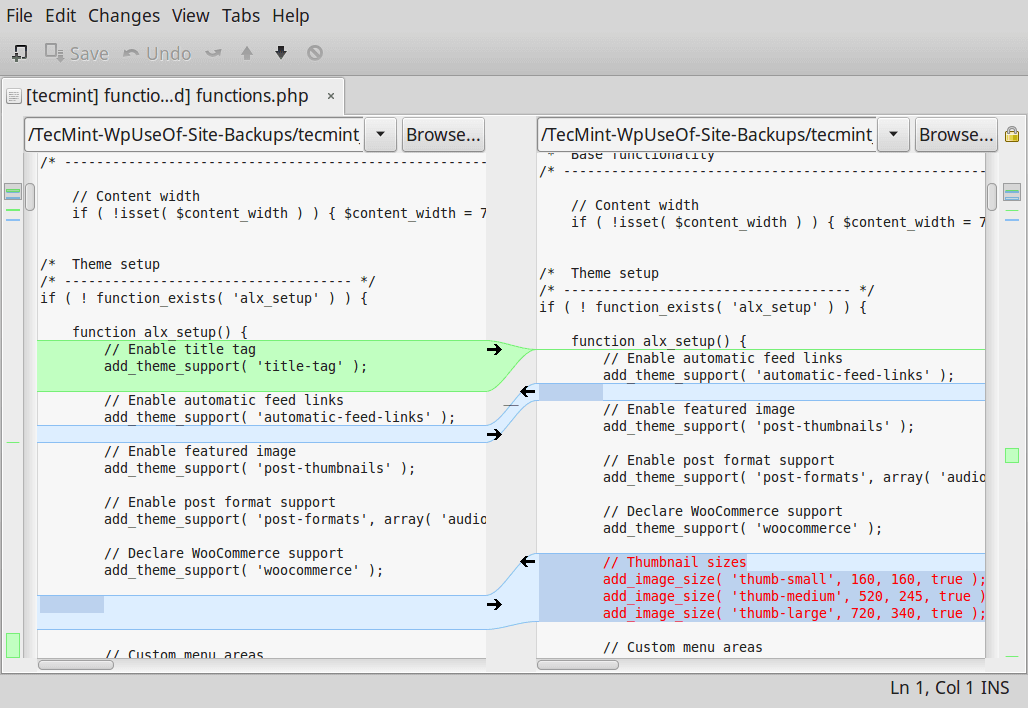
In addition to the built-in Git commands, there are also several external tools that can assist you in checking file differences. One notable tool is “GitKraken”, a popular Git client that provides a user-friendly interface to visualize file changes. GitKraken allows you to see the added, modified, or deleted lines within each file, making it easier to understand the changes made in your repository.
FAQs:
Q: How do I see the differences in the added, modified, and deleted lines within a file?
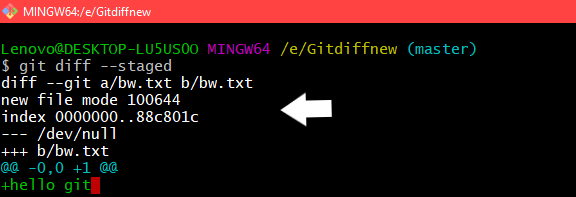
A: The “git diff” command displays the line-by-line differences between files. By default, it compares the working directory with the staging area. To see only the added lines, use the “–staged” option with the “git diff” command.
Q: Can I compare file changes across multiple branches?
A: Yes, you can compare file changes across multiple branches using the “git diff” command. Specify the two branches you want to compare by typing “git diff
Q: Are there any graphical tools available to compare file changes in Git?
A: Yes, several graphical tools are available to compare file changes in Git. GitKraken, mentioned earlier, is a popular choice. Other tools like SourceTree and TortoiseGit also offer visual interfaces to help you examine file differences.
Q: How can I see the differences between two specific commits?
A: To see the differences between two specific commits, use the “git diff
Q: Can I check the differences in a specific file between two branches?
A: Yes, you can compare a specific file between two branches using the “git diff
In conclusion, Git provides several methods to check file differences, allowing you to keep track of modifications, additions, and deletions in your repository. Whether you prefer using Git’s built-in commands or external tools, such as GitKraken, examining file changes is an essential aspect of managing your Git projects effectively. By understanding how to identify file differences, you can ensure the integrity and quality of your codebase throughout the development process.
How To Show Only Modified Files In Git?
Git is a powerful version control system widely used by developers to manage and track changes in their projects. It’s inevitable to have modified files during the development process, and sometimes, it becomes necessary to identify those files specifically. In this article, we will dive deep into how to show only modified files in Git and explore different ways to achieve this.
Method 1: Git Status Command
The simplest way to display modified files in Git is by using the “git status” command. When you execute this command, Git will list all changes made to your project’s branch, including modified files, untracked files, and staged files.
To use the “git status” command, open your terminal and navigate to your project’s directory. Then, simply type “git status” and hit enter. Git will provide a detailed summary of the project’s status, highlighting any modified files.
Method 2: Git Diff Command
Another way to show only the modified files is by using the “git diff” command. This command allows you to display the differences between different versions of your project. By specifying the “–name-only” flag with “git diff”, Git will list only the names of the modified files.
To display only the modified file names, open your terminal and navigate to your project’s directory. Then, type “git diff –name-only” and hit enter. Git will generate a list of modified file names, making it easier for you to identify the files that have been changed.
Method 3: Git Log Command
The “git log” command allows you to view the commit history of your project. By adding the “–name-only” flag with “git log”, Git will display a list of modified files for each commit. This method is particularly useful when you want to see the changes made to different versions of your project.
To utilize this method, open your terminal, navigate to your project’s directory, and type “git log –name-only” followed by pressing enter. Git will show the commit history along with the modified file names associated with each commit.
Method 4: Custom Git Alias
For frequent Git users, creating a custom alias can be a handy solution to view only the modified files. By creating an alias, you can reduce the typing effort and execute a specific command easily.
To create an alias, open your terminal and type in the following command:
git config –global alias.modified ‘status –short –untracked-files=no’
This command sets up an alias named “modified” that displays only the modified files while ignoring untracked files. You can replace “modified” with any preferred alias name. Once you’ve entered this command, you can simply type “git modified” in your terminal to see the modified files instantly.
FAQs:
Q: Can I use these methods to only display files modified in a specific branch?
A: Yes, these methods work seamlessly in any branch. Just make sure you are on the desired branch before executing the respective Git commands.
Q: Is it possible to filter modified files based on a specific file extension?
A: Yes, you can use various Git commands in combination with Linux commands like “grep” to filter modified files based on their extension. For example, you can use “git diff –name-only | grep ‘.js'” to display only modified JavaScript files.
Q: Can I see the differences in the modified files using these methods?
A: Yes, you can utilize additional flags or options with the mentioned Git commands to see the differences within the modified files. For example, the “git diff –color” command will display the differences with color highlighting.
Q: Is it possible to only display changes made to a specific file?
A: Yes, you can use the “git diff” command along with the file path to display changes made to a specific file. For example, “git diff path/to/file.js” will only show the changes in the file.js.
Q: How to show modified files in a submodule?
A: Git treats a submodule as a separate repository. To display modified files within a submodule, navigate to the submodule directory and execute the “git status” command or any other mentioned methods.
In conclusion, Git provides multiple efficient ways to show only modified files in your project. Whether you prefer using basic Git commands like “git status” or leveraging custom aliases, you can easily identify and track the changes made in your project. By exploring these different methods, you can streamline your workflow and save time in managing your Git repositories.
Keywords searched by users: git diff files only Git diff file, Git diff patch, Git diff example, Git diff file name, Git diff –name-only, Git diff 2 branch, Git diff commit, Git diff là gì
Categories: Top 80 Git Diff Files Only
See more here: nhanvietluanvan.com
Git Diff File
Introduction (100 words):
Git, the widely-used distributed version control system, offers a multitude of advanced features that streamline the collaboration process and allow developers to efficiently manage code changes. One such feature is the git diff file command, which enables users to compare and analyze the differences between two files. In this comprehensive article, we will explore the fundamentals of git diff file, delve into its intricacies, and provide practical examples to help you harness its power. Whether you are a beginner or an experienced developer, this guide will equip you with the knowledge needed to effectively use git diff file for code analysis.
Understanding Git Diff File (300 words):
Before we dive into the specifics of git diff file, it’s crucial to grasp the basic concepts underlying this feature. Git diff allows users to compare changes made to a file between different commits, branches, or even across various repositories. By utilizing git diff file, developers can identify additions, deletions, and modifications within the file, providing invaluable insights into the evolution of their codebase.
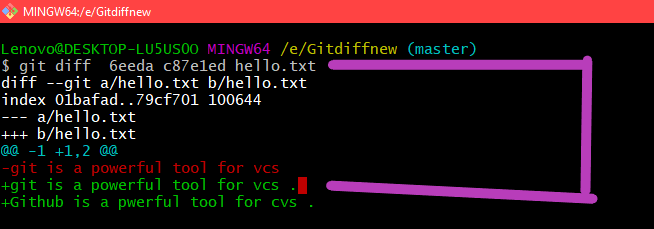
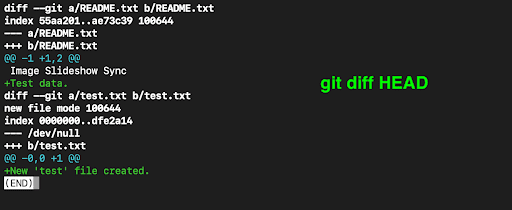
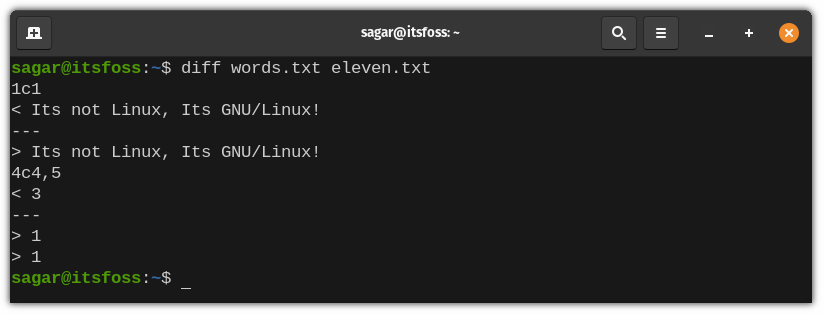
Git diff file displays the differences using the unified diff format, also known as the “diff” or “patch” format. This format provides a clear, human-readable representation of changes, highlighting additions with a ‘+’ symbol and deletions with a ‘-‘ symbol. Additionally, the context lines surrounding the changes provide a deeper understanding of the modifications.
Syntax and Usage (400 words):
To use git diff file, open your terminal and navigate to the repository you wish to examine. The basic command structure is as follows:
git diff file [options]
The
To compare the latest version of a file in the current branch with the previous commit’s version, enter:
git diff file HEAD^ —
You can also compare different branches, such as the main branch with a feature branch, using:
git diff file main..feature —
Understanding the options available with git diff file is essential for customizing the diff output. For instance, to display differences in color and line numbers, use the ‘-c’ and ‘-u’ options, respectively. You may also limit the output to specific lines within a file by providing line range parameters, such as ‘-L
Practical Use Cases (250 words):
Git diff file offers numerous applications in day-to-day development workflows. Some notable use cases include:
1. Reviewing code changes: By comparing different versions of a file, you can easily review and provide feedback on specific code modifications.
2. Debugging changes: Git diff file helps pinpoint the source of an error by isolating differences introduced between successful and failing code states.
3. Collaborative code integration: Before merging branches or accepting pull requests, analyzing file differences is crucial to ensure seamless code integration.
FAQs (209 words):
Q1: Can I use git diff file to compare multiple files simultaneously?
A1: Yes, simply add the file paths separated by spaces after the ‘–‘ option in the command.
Q2: Is it possible to compare changes across commits made by different authors?
A2: Yes, using the ‘–author’ option followed by the desired author’s name, you can filter the commits for comparison.
Q3: How can I suppress binary files in git diff file output?
A3: Adding the ‘–no-index’ option followed by the file paths omits binary files from the comparison, focusing solely on textual changes.
Q4: Can git diff file be used to compare directories as well?
A4: Yes, by specifying the directory path instead of a file path, you can analyze differences between directories in a similar manner.
Conclusion (40 words):
Understanding the power of git diff file is essential for effective code management and collaboration. By providing detailed insights into code changes, this feature empowers developers to navigate complex codebases with ease.
Git Diff Patch
Introduction
Git is a widely used and powerful version control system that allows developers to track changes to their codebase over time. One of the key features provided by Git is the ability to create and apply patches using the “git diff” and “git apply” commands. In this article, we will delve deeper into the concept of Git diff patches, exploring what they are, how to create them, and how to apply them. We will also address some frequently asked questions to provide a comprehensive understanding of this essential Git feature.
What is a Git Diff Patch?
A Git diff patch is essentially a text file that captures the differences between two versions of a file or a set of files. It records changes made to the code, including additions, deletions, and modifications. These patches can be shared with others or stored for future reference. By applying a diff patch, one can reverse-engineer the changes made in a previous commit or even merge the changes into another branch.
Creating a Git Diff Patch
To create a diff patch, you first need to identify the files or commits you wish to compare. The “git diff” command allows you to generate a patch between the current state of the repository and a previous commit, or between two specific commits. For example, running “git diff HEAD~2 HEAD” generates a patch between the current commit and the one made two commits ago.
Once the “git diff” command is executed, a textual representation of the changes will be displayed in the terminal. To save this output to a file, you can redirect the output using the following command: “git diff HEAD > mypatch.patch”. This command saves the patch to a file called “mypatch.patch”, but you can choose any file name.
Applying a Git Diff Patch
To apply a diff patch, you must have the patch file and the codebase on which you want to apply the changes. The “git apply” command patches the codebase with the changes specified in the patch file. Simply run “git apply mypatch.patch” to apply the patch. If all goes well, the changes will be applied, and you will receive a notification indicating the success of the operation.
It is worth noting that “git apply” only modifies the working directory; it does not make any changes to the commit history. If you want to make permanent changes to the commit history, you should consider using the “git am” command, which applies patches and creates new commits.
Frequently Asked Questions
Q1: Can I generate a diff patch for a single file only?
A1: Yes, you can generate a diff patch for a single file by specifying the file path after the “git diff” command. For example, “git diff HEAD~1 — myfile.js” generates a diff patch for the file “myfile.js” between the current commit and the preceding one.
Q2: What if I want to exclude certain changes from the diff patch?
A2: You can selectively exclude changes by using Git’s patch staging capabilities. By running “git add -p” before creating the diff patch, you can choose which changes to include and which changes to omit, providing greater control over the patch generation process.
Q3: Can I apply a diff patch to a different branch?
A3: Yes, you can apply a diff patch to a different branch. Before running “git apply”, make sure you are on the desired branch using “git checkout [branch-name]”. Take caution when applying patches to branches with significant code differences, as conflicts may arise.
Q4: How can I share a diff patch with others?
A4: To share a diff patch with others, you can simply send them the patch file via email or a file-sharing service. The recipient can then apply the patch using the “git apply” or “git am” command, depending on their needs.
Q5: Can a diff patch be used to undo changes?
A5: Yes, a diff patch can be used to undo changes made in a previous commit. By applying the patch with the “–reverse” flag, Git will revert the changes made by the patch instead of applying them. This is especially useful when you want to roll back specific changes without changing the commit history.
Conclusion
Git diff patches provide a valuable mechanism for capturing and sharing changes made to a codebase. Understanding how to create and apply these patches plays a crucial role in collaboration and managing code versions effectively. By utilizing the “git diff” and “git apply” commands, developers gain finer control over their codebase, enabling them to track changes, merge branches, or reverse commits accurately. With the knowledge gained from this article, you can confidently leverage the power of Git diff patches in your development workflow.
Images related to the topic git diff files only

Found 44 images related to git diff files only theme












Article link: git diff files only.
Learn more about the topic git diff files only.
- How to list only the names of files that changed between two …
- Git Diff: A How-To Guide – Career Karma
- Recording Changes to the Repository – Git SCM
- Find what changed in a Git commit – Opensource.com
- Commit only part of a file’s changes in Git – Stack Overflow
- git-diff Documentation – Git
- Getting a list of the changed files | Git Version Control Cookbook
- 15+ ways to check git file changes, git diff, git status (2023)
- How to List Only the Names of Files that Changed Between …
- Git Diff: Only Show Filenames – Coding for SEO
- Git diff Command – How to Compare Changes in Your Code
- explainshell.com – git diff –cached –name-only
- All things git diff (on specific files) – Programmer Hat
- These two commands creates a tar file of all the … – GitHub Gist
See more: nhanvietluanvan.com/luat-hoc