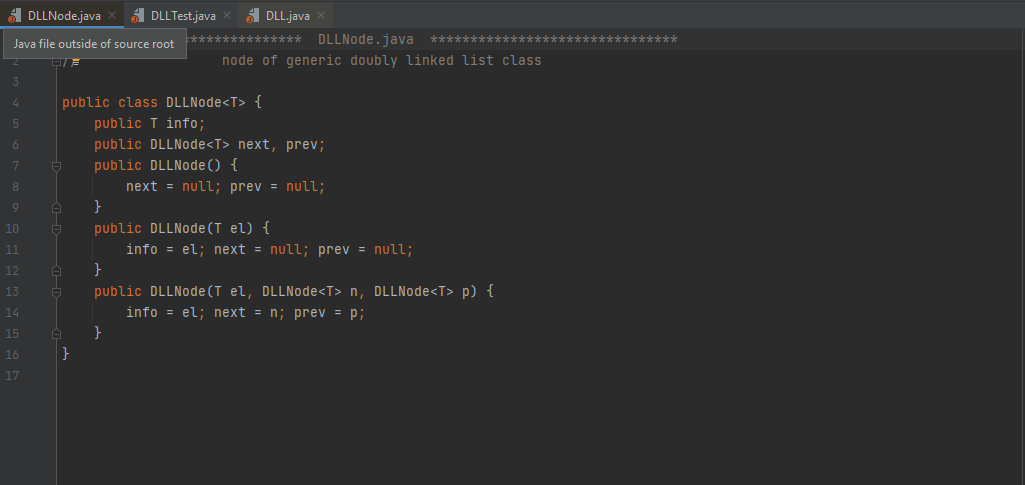
Java File Outside Of Source Root
Specifying the source root is crucial because it allows the Java compiler to locate the source files and compile them correctly. If the source root is not properly defined, the compiler may not be able to find the Java files, resulting in compilation errors.
Understanding the purpose of the source root is essential for smooth development. The source root serves as a reference point for the compiler and other tools in the development environment. It helps in maintaining a structured directory hierarchy for organizing the source files and resources of a project.
Creating a Java file outside of the source root is not a common practice, but there might be situations where it becomes necessary. For instance, if you are working on a shared library that needs to be used across multiple projects, it can be beneficial to have the library files outside the source root of individual projects.
To include a Java file outside of the source root in a project, you need to make sure that the file is accessible to the compiler. This can be achieved by adding the directory containing the Java file to the project’s classpath. By doing so, the compiler will be able to locate and compile the Java file correctly.
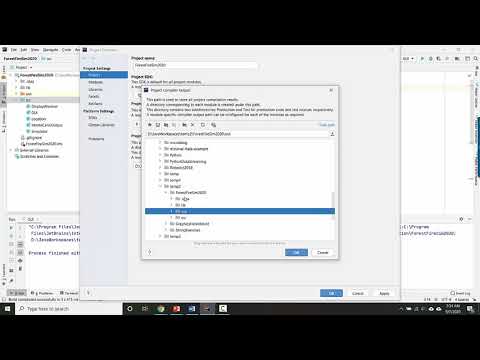
Compiling and running a Java file outside of the source root can be done using command-line tools or integrated development environments (IDEs) like IntelliJ IDEA. In IntelliJ IDEA, you can modify the project settings to include the directory containing the Java file outside of the source root. This will allow the IDE to recognize the Java file and provide code suggestions, syntax highlighting, and other features.
However, working with Java files outside of the source root can have its challenges. It is essential to follow certain best practices to avoid potential pitfalls. Here are some best practices to consider when working with Java files outside of the source root:
1. Keep the directory structure organized: Even though the Java files are outside of the source root, it is still crucial to maintain a structured directory hierarchy. This will make it easier to navigate and locate the files when needed.
2. Use explicit package declarations: When creating Java files outside of the source root, it is recommended to use explicit package declarations to avoid potential conflicts with other files or packages.
3. Be mindful of the classpath: Make sure to add the directory containing the Java file to the project’s classpath so that the compiler and IDE can locate it correctly.
4. Keep the project structure consistent: If you are working in a team, it is essential to ensure that all team members follow the same practices when working with Java files outside of the source root. Consistency in the project structure will make collaboration and maintenance easier.
Now let’s address some frequently asked questions related to working with Java files outside of the source root.
FAQs:
Q: How do I create a source root in IntelliJ?
A: To create a source root in IntelliJ IDEA, right-click on the project directory, select “New” and then choose “Directory.” Enter the name of the directory and make sure to select the “Mark as: Sources Root” option.
Q: I’m getting an error saying “Module must not contain source root.” What should I do?
A: This error occurs when you try to include a directory as a source root that is already marked as a source root or contains other source roots. You will need to remove the conflicting source root before adding the desired directory as a source root.
Q: How do I specify a file path in Java when the Java file is outside of the source root?
A: When referencing a Java file outside of the source root, you can provide the absolute file path or use relative paths based on the current working directory. It is recommended to use relative paths to ensure portability across different environments.
Q: IntelliJ is not showing my project files outside of the source root. What should I do?
A: This issue might occur if the directory containing the Java files outside of the source root is not added to the project’s classpath. Make sure to add the directory to the classpath so that IntelliJ can recognize and display the files correctly.
Q: I’m getting a “Java: error: release version 19 not supported” or “Java: error: invalid source release: 17” error. How can I fix it?
A: These errors usually occur when the Java version specified in the project settings or compiler options does not match the one you are using. Make sure to configure the project to use the correct Java version.
Q: I’m getting a warning saying “source release: 11 requires target release: 11” when compiling a Java file outside of the source root. What does it mean?
A: This warning indicates that the target Java version specified in the project settings or compiler options does not match the source release version. To resolve this warning, make sure to set the target release version to match the source release version.
In conclusion, working with Java files outside of the source root can be a useful approach in certain scenarios. By following the best practices mentioned above and resolving any potential issues, you can make the process seamless and efficient.
Configure Your Intellij Project
How To Fix Java File Outside Of Source Root?
When working on Java projects, one common issue that developers often encounter is dealing with Java files that are located outside of the source root. This can happen due to various reasons such as a wrong project setup, migrating files from a different location, or even a mistake during the file creation process. Regardless of the cause, having Java files outside of the source root can lead to compilation errors and hinder the overall development process. In this article, we will explore the reasons behind this problem and provide a step-by-step guide on how to fix it.
Understanding the source root
Before delving into the steps to fix the issue, it is essential to have a clear understanding of what the source root is. The source root is the top-level directory in a Java project that contains the source files. It typically includes the package structure and serves as the starting point for the compilation process. In most Integrated Development Environments (IDEs), such as IntelliJ IDEA or Eclipse, the source root is designated as a source folder.
Reasons for Java files outside of source root
There can be several reasons why a Java file ends up outside of the source root. Here are some common situations:
1. Incorrect project setup: If the project setup is not done properly or if the source root is mistakenly set to a different location, Java files may be saved in the wrong directory.
2. File migration: When moving files from one location to another, it is possible to accidentally misplace Java files outside of the designated source root.
3. Human error: It is not uncommon for developers to make mistakes while creating or saving Java files, inadvertently saving them in the wrong directory.
Fixing Java files outside of source root
Now let’s explore the steps to fix the issue of Java files located outside of the source root:
1. Identify the misplaced files: The first step is to identify the Java files that are outside of the source root. Look for files that are not within the designated package structure or source folder.
2. Create a new package: To bring the misplaced files into the source root, you need to create a new package within the source root directory. Right-click on the source root folder in your IDE and choose the option to create a new package.
3. Move files to the new package: Once the package is created, you can move the misplaced Java files to the newly created package. Simply drag and drop the files from their current location to the package within the source root directory.
4. Update package declarations: After moving the files, update the package declarations in the Java files to reflect the new package structure. Open each file and modify the package declaration statement at the top to match the newly created package.
5. Resolve import statements: If the misplaced Java files have any import statements that reference other files within the project, you may need to resolve those import statements. Ensure that the import statements point to the correct location after relocating the files.
6. Rebuild the project: Once all the necessary modifications have been made, rebuild the project to ensure that the changes are reflected correctly. This will trigger the recompilation of the source files and validate the changes made.
FAQs:
Q: Can I simply move the Java files manually without creating a new package?
A: While physically moving the files may appear to fix the issue, it is essential to create a new package within the source root to maintain proper project structure and package hierarchy.
Q: What happens if I don’t fix Java files outside of the source root?
A: If Java files remain outside of the source root, the compilation process may fail, resulting in errors. It can also lead to confusion, as developers may have difficulty locating or tracking changes in the project.
Q: Are there any automated solutions to fix this issue?
A: Some IDEs provide automated solutions to fix misplaced Java files. For instance, IntelliJ IDEA offers a “Move class to the correct package” refactoring tool that simplifies the process.
Q: How can I prevent Java files from ending up outside of the source root in the future?
A: Proper project setup and awareness of the designated source root are key to avoiding this issue. Double-checking the file location before saving and being cautious while migrating files can help prevent such occurrences.
In conclusion, having Java files located outside of the source root can be a common issue during development. However, by following the step-by-step guide provided in this article, you can effectively fix the problem and ensure smooth compilation and development processes. Remember to create a new package, move the files, update package declarations, resolve import statements, and rebuild the project. By addressing these steps, you’ll resolve the issue and maintain a well-structured Java project.
What Is Java Source Root?
In Java programming, a source root refers to the root directory or folder that contains the source code files of a Java project. It is the starting point from which the Java compiler reads and compiles the source code to generate the bytecode, which is then executed by the Java Virtual Machine (JVM). Understanding the concept of source root is essential for Java developers as it plays a crucial role in organizing and building Java projects.
Source Root Structure
The source root typically follows a specific structure. It contains one or more packages, where each package represents a specific component or module of the Java project. Within each package, Java source code files (with a .java extension) are stored. These files contain the actual code written by the programmer.
The source root also includes special directories such as “src/main/java” or “src/com/example/project”. These directories are usually predefined in build tools such as Apache Maven or Gradle, which are often used to manage Java projects. These tools specify the source root structure and help automate the build process.
Why is Source Root Important?
The source root holds significant importance in Java development for several reasons:
1. Code Organization: By following the source root structure, developers can effectively organize their codebase. It helps avoid clutter, enables easy navigation, and enhances code readability and maintainability. Additionally, it allows multiple developers to work collaboratively on a project without conflicting code changes.
2. Compilation: The source root is crucial for the Java compiler to locate and compile the source code files. It ensures that the compiler can access all the necessary classes and dependencies required to build the project. Without a proper source root structure, compilation errors may occur, hindering the process of generating bytecode.
3. Build Automation: Build tools like Apache Maven and Gradle rely on the source root structure to automate the build process. These tools use the source root directory as a starting point to scan and compile the entire codebase, manage dependencies, run tests, and package the final deliverables. A correctly defined source root structure enables smooth integration with build tools and facilitates efficient project management.
4. Code Sharing: Source root comes into play when sharing Java projects with others or contributing to open-source projects. By providing the source root structure, other developers can easily understand the project’s layout and dependencies. It simplifies collaboration and ensures that the shared code can be readily compiled and executed in different development environments.
Frequently Asked Questions (FAQs):
Q1. Can I have multiple source roots in a Java project?
A1. Yes, Java projects can have multiple source roots. This is often the case when a project consists of multiple modules or components that may require separate source directories. Build tools like Maven and Gradle allow specifying multiple source directories to accommodate such scenarios.
Q2. Can the source root be changed or relocated?
A2. While it is generally advisable to define the source root structure early in a project, it is possible to change or relocate the source root. However, care must be taken when doing so, as it may require updating configuration files, build scripts, or IDE settings to reflect the new source root location.
Q3. What happens if the source root is not defined?
A3. If the source root is not properly defined or cannot be located by the build tools, compilation errors may occur. The Java compiler relies on the source root structure to identify and compile the required source code files. Without a valid source root, the compiler may fail to find the necessary classes or dependencies, resulting in compilation errors.
Q4. Can the source root structure vary between different IDEs?
A4. The source root structure is generally defined based on build tool conventions rather than specific IDE configurations. However, IDEs like IntelliJ IDEA and Eclipse allow customization of project structures, including the source root. Developers should ensure consistency across IDEs and build tools to prevent any compatibility issues.
Q5. Are there any best practices for organizing the source root structure?
A5. While the source root structure can vary based on project requirements and conventions, certain best practices can enhance code organization. For instance, organizing source code files based on functional modules or components can improve maintainability. Using clear and concise package names and following naming conventions can also contribute to code readability. It is recommended to consult project-specific guidelines or industry best practices for structuring the source root.
In conclusion, the source root serves as the foundation and starting point for Java projects. It defines the structure and organization of the source code, facilitates compilation, enables build automation, and supports collaboration and code sharing. By understanding the concept of source root and adhering to a well-defined structure, Java developers can streamline their development process and ensure a scalable and manageable codebase.
Keywords searched by users: java file outside of source root Java file outside of source root IntelliJ, Intellij create source root, Module must not contain source root, File path in java, IntelliJ not showing project files, Java: error: release version 19 not supported, Java: error: invalid source release: 17, Java warning source release: 11 requires target release: 11
Categories: Top 74 Java File Outside Of Source Root
See more here: nhanvietluanvan.com
Java File Outside Of Source Root Intellij
IntelliJ is a popular integrated development environment (IDE) used by Java developers worldwide. It offers several features that facilitate coding and improve productivity. One common task that developers encounter is the need to create a Java file outside of the source root, i.e., a file that is not located in the default project structure. In this article, we will explore how to accomplish this in IntelliJ, along with some frequently asked questions regarding this topic.
Creating a Java file outside of the source root in IntelliJ involves a few simple steps. Let’s dive into it:
Step 1: Open your IntelliJ project and navigate to the project explorer on the left-hand side. Right-click on the desired directory or package where you want to create the Java file. Select “New” from the context menu and click on the “Java Class” option.
Step 2: In the “New Java Class” dialog box, provide a suitable name for your Java file along with the desired package name. By default, the package will reflect the directory structure. Make sure to uncheck the “Create package-info.java” option if you don’t need it. Click on the “OK” button to create the Java file.
Step 3: After the file is created, IntelliJ may indicate that the file is located outside of the source root by showing a warning icon. This is perfectly normal since the file is not in the default source directory. You can proceed with writing code in the file just like any other Java file.
Now, let’s address some frequently asked questions regarding Java files outside of the source root in IntelliJ:
FAQs:
Q1: Why would I need to create a Java file outside of the source root?
A: There can be several reasons for this. One common use case is when you want to integrate third-party libraries or frameworks that require their own custom directory structure. Another scenario is when you want to organize your code in a hierarchical manner that doesn’t fit within the standard source structure.
Q2: Can I import classes from a Java file located outside of the source root?
A: Yes, you can import classes from Java files located outside of the source root. IntelliJ’s IntelliJ’s intelligent code analysis will recognize the dependencies and automatically update the compilation process.
Q3: How can I run a Java file located outside of the source root?
A: Running a Java file located outside of the source root is no different from running any other Java file in IntelliJ. Simply right-click on the Java file, select “Run” from the context menu, and choose the appropriate run configuration.
Q4: Is it recommended to create Java files outside of the source root?
A: While creating Java files outside of the source root is possible, it is generally not recommended unless necessary. The standard source root structure provides a well-defined and organized way to structure your code, making it easier for other developers to understand and maintain your project.
Q5: How can I modify the default source root in IntelliJ?
A: IntelliJ allows you to modify the default source root if needed. You can go to the project settings, navigate to the “Modules” section, and select the desired module. Under the “Sources” tab, you can add, remove, or modify the source roots according to your requirements.
To conclude, IntelliJ provides the necessary tools to create and work with Java files outside of the source root. While such scenarios may arise due to specific project requirements, it is advisable to adhere to the standard source root structure whenever possible for better code organization.
Intellij Create Source Root
Creating a source root is simple and intuitive within IntelliJ IDEA. A source root is a directory in which source files, such as Java classes, Kotlin files, or any other programming language files, are stored. IntelliJ IDEA provides a flexible way to manage source roots within a project, ensuring that the code is organized and accessible.
To create a source root in IntelliJ IDEA, follow these steps:
1. Open the project in which you want to create a source root.
2. Right-click on the project’s main folder in the project view (usually displayed on the left-hand side) and select “New” from the context menu.
3. Choose the desired source file type, such as “Java Class” or “Kotlin File,” and IntelliJ IDEA will automatically create the appropriate file and directory structure for that file type.
4. Specify the name and location of the file, and click “OK”.
5. IntelliJ IDEA will create the source file and place it in the designated source root directory.
It is important to note that a project can have multiple source roots. This provides developers with the flexibility to separate different types of code or modules within their project. For example, an application might have separate source roots for the main application code, test code, and external libraries. By organizing the code in this manner, it becomes easier to navigate, test, and collaborate on projects.
Now, let’s address some frequently asked questions about creating source roots in IntelliJ IDEA:
Q: Can I create nested source roots within a project?
A: Yes, IntelliJ IDEA allows the creation of nested source roots. This can be useful when working with complex projects that have multiple layers or modules.
Q: Can I convert an existing directory into a source root?
A: Absolutely! IntelliJ IDEA provides a simple way to convert an existing directory into a source root. Right-click on the directory in the project view, go to “Mark Directory as”, and select “Sources Root”.
Q: How can I remove a source root?
A: Removing a source root is as simple as converting it. Right-click on the source root directory in the project view, go to “Mark Directory as”, and select “Cancel Sources Root”.
Q: Can I have multiple source roots for different programming languages?
A: Yes, IntelliJ IDEA allows you to have multiple source roots for different programming languages within the same project. This is particularly useful when working on projects that involve multiple languages or frameworks.
Q: Are there any limitations on the number of source roots within a project?
A: There are no specific limitations on the number of source roots within a project. However, having too many source roots may complicate the project structure and make it harder to manage. It is advisable to keep the number of source roots to a reasonable level for better project organization.
Q: Can I configure custom source root directories?
A: Yes, IntelliJ IDEA allows you to configure custom source root directories. This can be done by going to the project settings, selecting “Modules”, and then specifying the desired directories as source roots.
In conclusion, creating source roots within IntelliJ IDEA is a straightforward process that greatly enhances the organization and management of code within projects. By following a few simple steps, developers can create and manage multiple source roots efficiently. This feature promotes better code navigation, collaboration, and overall project maintainability. With its flexibility and wide range of functionalities, IntelliJ IDEA continues to be a popular choice among developers for efficient software development.
Images related to the topic java file outside of source root
Found 34 images related to java file outside of source root theme


Article link: java file outside of source root.
Learn more about the topic java file outside of source root.
- Java file outside of source root intelliJ – Stack Overflow
- Java File Outside of Source Root: How To Fix the Error in Intellij
- Java file outside of source root – quick fixes – LinuxPip
- Java File Outside of Source Root: How To Fix the Error in Intellij
- SourceRoot (javaparser-core 3.5.0 API) – javadoc.io
- Content roots | IntelliJ IDEA Documentation – JetBrains
- [Solved]-Java file outside of source root intelliJ-Springboot
- “Java file outside of source root” when using manifest.srcFile …
- Java file outside of source root : r/IntelliJIDEA – Reddit
- InteliJ Spring Boot Java file outside of source root – Memto
- Cannot find declaration to go to, Nothing here, Java file …
See more: https://nhanvietluanvan.com/luat-hoc/