Undo Git Stash Pop
Introduction:
Git stash is a powerful command that allows developers to save changes that are not ready to be committed, allowing them to switch branches without losing their work. The git stash pop command is used to remove and apply stashed changes to the current branch. However, there may be instances where you need to undo the git stash pop command and revert the changes. In this article, we will explore why you may want to undo git stash pop, how to identify if a git stash pop needs to be undone, and the steps to effectively undo git stash pop in Git. We will also discuss best practices for managing and undoing git stash pop.
What is Git Stash Pop?
Git stash pop is a command that is used to remove a single stash from the stash list and apply it to the current branch. It is often used to retrieve previously saved changes when switching branches or resolving conflicts. However, it can be useful to undo git stash pop if you have applied the wrong stash or if you encounter conflicts that you are unable to resolve.
Why would you want to undo Git Stash Pop?
There are several reasons why you may want to undo git stash pop:
1. Applied the wrong stash: If you have multiple stashes and you accidentally apply the wrong stash using git stash pop, you may need to undo it to apply the correct stash.
2. Conflict resolution issues: Occasionally, conflicts may arise when applying stashed changes. If you are unable to resolve these conflicts or are not satisfied with the outcome, undoing the git stash pop can help you restart the process.
3. Mistakenly popped changes: It’s possible to mistakenly pop a stash when you intended to apply it without removing it from the stash list. In such cases, undoing the stash pop will help you keep the changes in the stash list while still applying them to your working branch.
How to Identify if a Git Stash Pop Needs to be Undone?
Identifying the need to undo a git stash pop is crucial to avoid any potential loss of work. Here are a few indicators that suggest you may need to undo a git stash pop:
1. Missing changes: If you can’t find the changes you expect to see after performing a git stash pop, it’s likely that you accidentally popped the wrong stash or encountered conflicts that need to be resolved.
2. Unexpected changes: If you notice unexpected changes in your working directory after a git stash pop, it’s possible that the applied stash contained changes that you didn’t anticipate or intend to apply.
Understanding the Consequences of Undoing Git Stash Pop:
Before undoing a git stash pop, it’s essential to understand the consequences it may have on your repository and codebase. Undoing a stash pop will revert the applied changes and restore your working directory to the state before the pop. It’s crucial to carefully consider the impact and potential conflicts that might arise when undoing a git stash pop.
Using the Git Reflog Command to Find the Commit Before the Stash Pop:
To effectively undo a git stash pop, you need to locate the commit before the stash pop. The git reflog command allows you to view a detailed log of the reference updates in your repository. By executing the following command, you can view the commit history, including the stash pops:
“`
git reflog
“`
The output will display a list of commits along with their corresponding commit hash.
Steps to Undo Git Stash Pop Using the Reflog Command:
Once you have identified the commit hash before the stash pop, you can follow these steps to undo the git stash pop:
1. Find the commit hash corresponding to the stash pop you wish to undo using the git reflog command.
2. Execute the following command, replacing `
“`
git reset –hard
“`
This command will reset the branch to the commit before the stash pop, effectively undoing the applied changes.
Using the Git Reset Command to Unstage the Changes from the Undone Stash Pop:
After undoing the git stash pop, the changes that were previously applied will be unstaged. To unstage these changes, you can use the git reset command with the `HEAD` option:
“`
git reset HEAD
“`
Using the Git Stash Command to Reapply the Stash that Was Popped:
Once the stash pop has been successfully undone, you can reapply the stash using the git stash apply command. This will allow you to apply the stash without removing it from the stash list:
“`
git stash apply
“`
Understanding the Potential Conflicts and Resolutions When Reapplying the Stash:
When reapplying the stash after undoing a git stash pop, conflicts may arise if the code has been modified since the stash was originally created. These conflicts need to be carefully resolved to ensure the integrity and functionality of the codebase. Git provides tools such as diff and merge tools to help in the resolution process.
Best Practices for Managing and Undoing Git Stash Pop:
To effectively manage and undo git stash pop, it is advisable to follow these best practices:
1. Use descriptive stash messages: When creating stashes, provide meaningful messages to easily identify the purpose or changes associated with the stash.
2. Double-check before applying: Before applying a stash, double-check to ensure you are applying the desired stash. This will help avoid mistakenly popping the wrong stash.
3. Resolve conflicts promptly: If conflicts arise during stash application, promptly address them to prevent potential issues when undoing stash pops.
4. Regularly review and clean up stashes: Periodically review the stash list and remove unnecessary or obsolete stashes to maintain a clean and organized repository.
In Conclusion:
Git stash pop is a valuable command for managing changes in Git repositories. However, there may be instances where it becomes necessary to undo a git stash pop. By following the steps outlined in this article and adhering to best practices, you can effectively manage and undo git stash pop, ensuring the integrity and functionality of your codebase.
FAQs:
Q1: Can I undo a git stash pop if I have already committed the changes?
A1: Yes, you can still undo a git stash pop even if you have already committed the changes. By using the git reflog command, you can locate the commit before the stash pop and follow the steps outlined in this article to undo the stash pop.
Q2: Is it possible to undo multiple git stash pops?
A2: Yes, you can undo multiple git stash pops by identifying the corresponding commit hash for each stash pop and repeating the steps mentioned in this article for each stash.
Q3: What is the difference between git stash apply and git stash pop?
A3: git stash apply applies a stash to the current branch without removing it from the stash list, while git stash pop applies a stash and removes it from the stash list.
Git Stash Command | Git Stash | Git Stash Apply | Git Stash Pop
Keywords searched by users: undo git stash pop Undo git stash pop, Git stash pop conflict, Git remove stash pop, Git revert stash, Undo git stash drop, Git stash apply, Git stash pop 2 times, Git stash show
Categories: Top 70 Undo Git Stash Pop
See more here: nhanvietluanvan.com
Undo Git Stash Pop
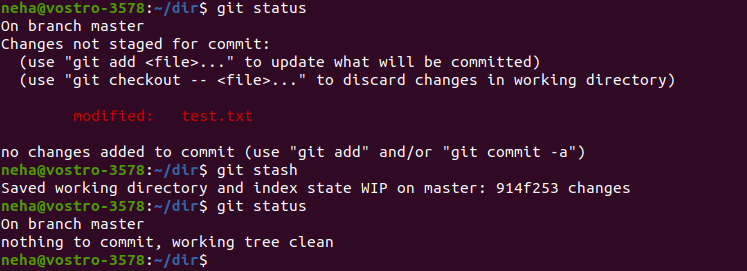
Git is a popular version control system that allows developers to track changes in code, collaborate with team members, and safely store their work. One of the features Git offers is the ‘stash’ command, which enables developers to save their changes temporarily without committing them to the repository. This is particularly useful when you’re in the middle of working on one task and need to switch to another quickly. However, sometimes mistakes happen, and you accidentally pop a stash prematurely or realize that you still need some of the changes you had stashed away. In this article, we will delve into the topic of undoing a ‘git stash pop’ operation and recovering your changes.
Understanding Git Stash Pop:
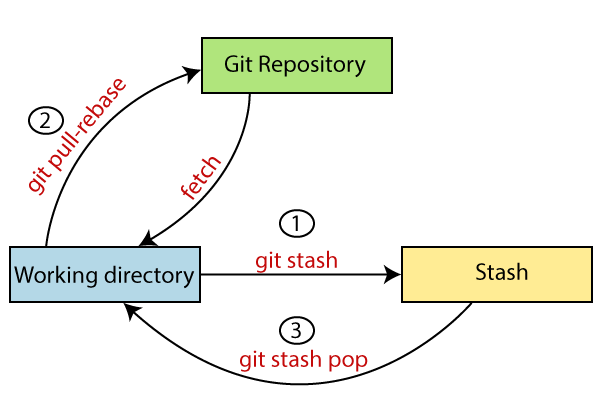
Before diving into the undo process, it’s essential to understand what ‘git stash pop’ does. When you execute this command, Git retrieves the most recent stash from the stack and applies it to the current state of your working directory. This means that the changes you stashed earlier, instead of being saved for later use, are re-integrated into your code. Stashing is often used to address unexpected changes or conflicts that may arise when switching branches or pulling new code. However, when you mistakenly use ‘git stash pop’ or find that you need the stashed changes again, you’ll need to perform an undo operation.
Recovering Stashed Changes:
Once you realize that you’ve accidentally popped a stash or need to recover the stashed changes, the first step is to identify the commit hash of the popped stash. To retrieve the commit hash, you can use the ‘git reflog’ command, which lists the recent actions performed within your repository. By scanning through the list, you can find the commit hash corresponding to the ‘stash@{N}’ entry, where ‘N’ represents the index of the popped stash.
Once you’ve obtained the commit hash, you can create a branch based on it using the ‘git branch’ command. This branch will be a copy of the popped state, allowing you to access the stashed changes. For example, using the command ‘git branch recovery-branch
FAQs:
Q: Can I undo a git stash pop without knowing the commit hash?
A: Unfortunately, without the commit hash, it becomes challenging to locate the exact state of the popped stash. However, using ‘git reflog,’ you can scan through the recent actions and try to identify the appropriate commit based on timestamps and action descriptions.
Q: How can I prevent accidentally popping stashes?
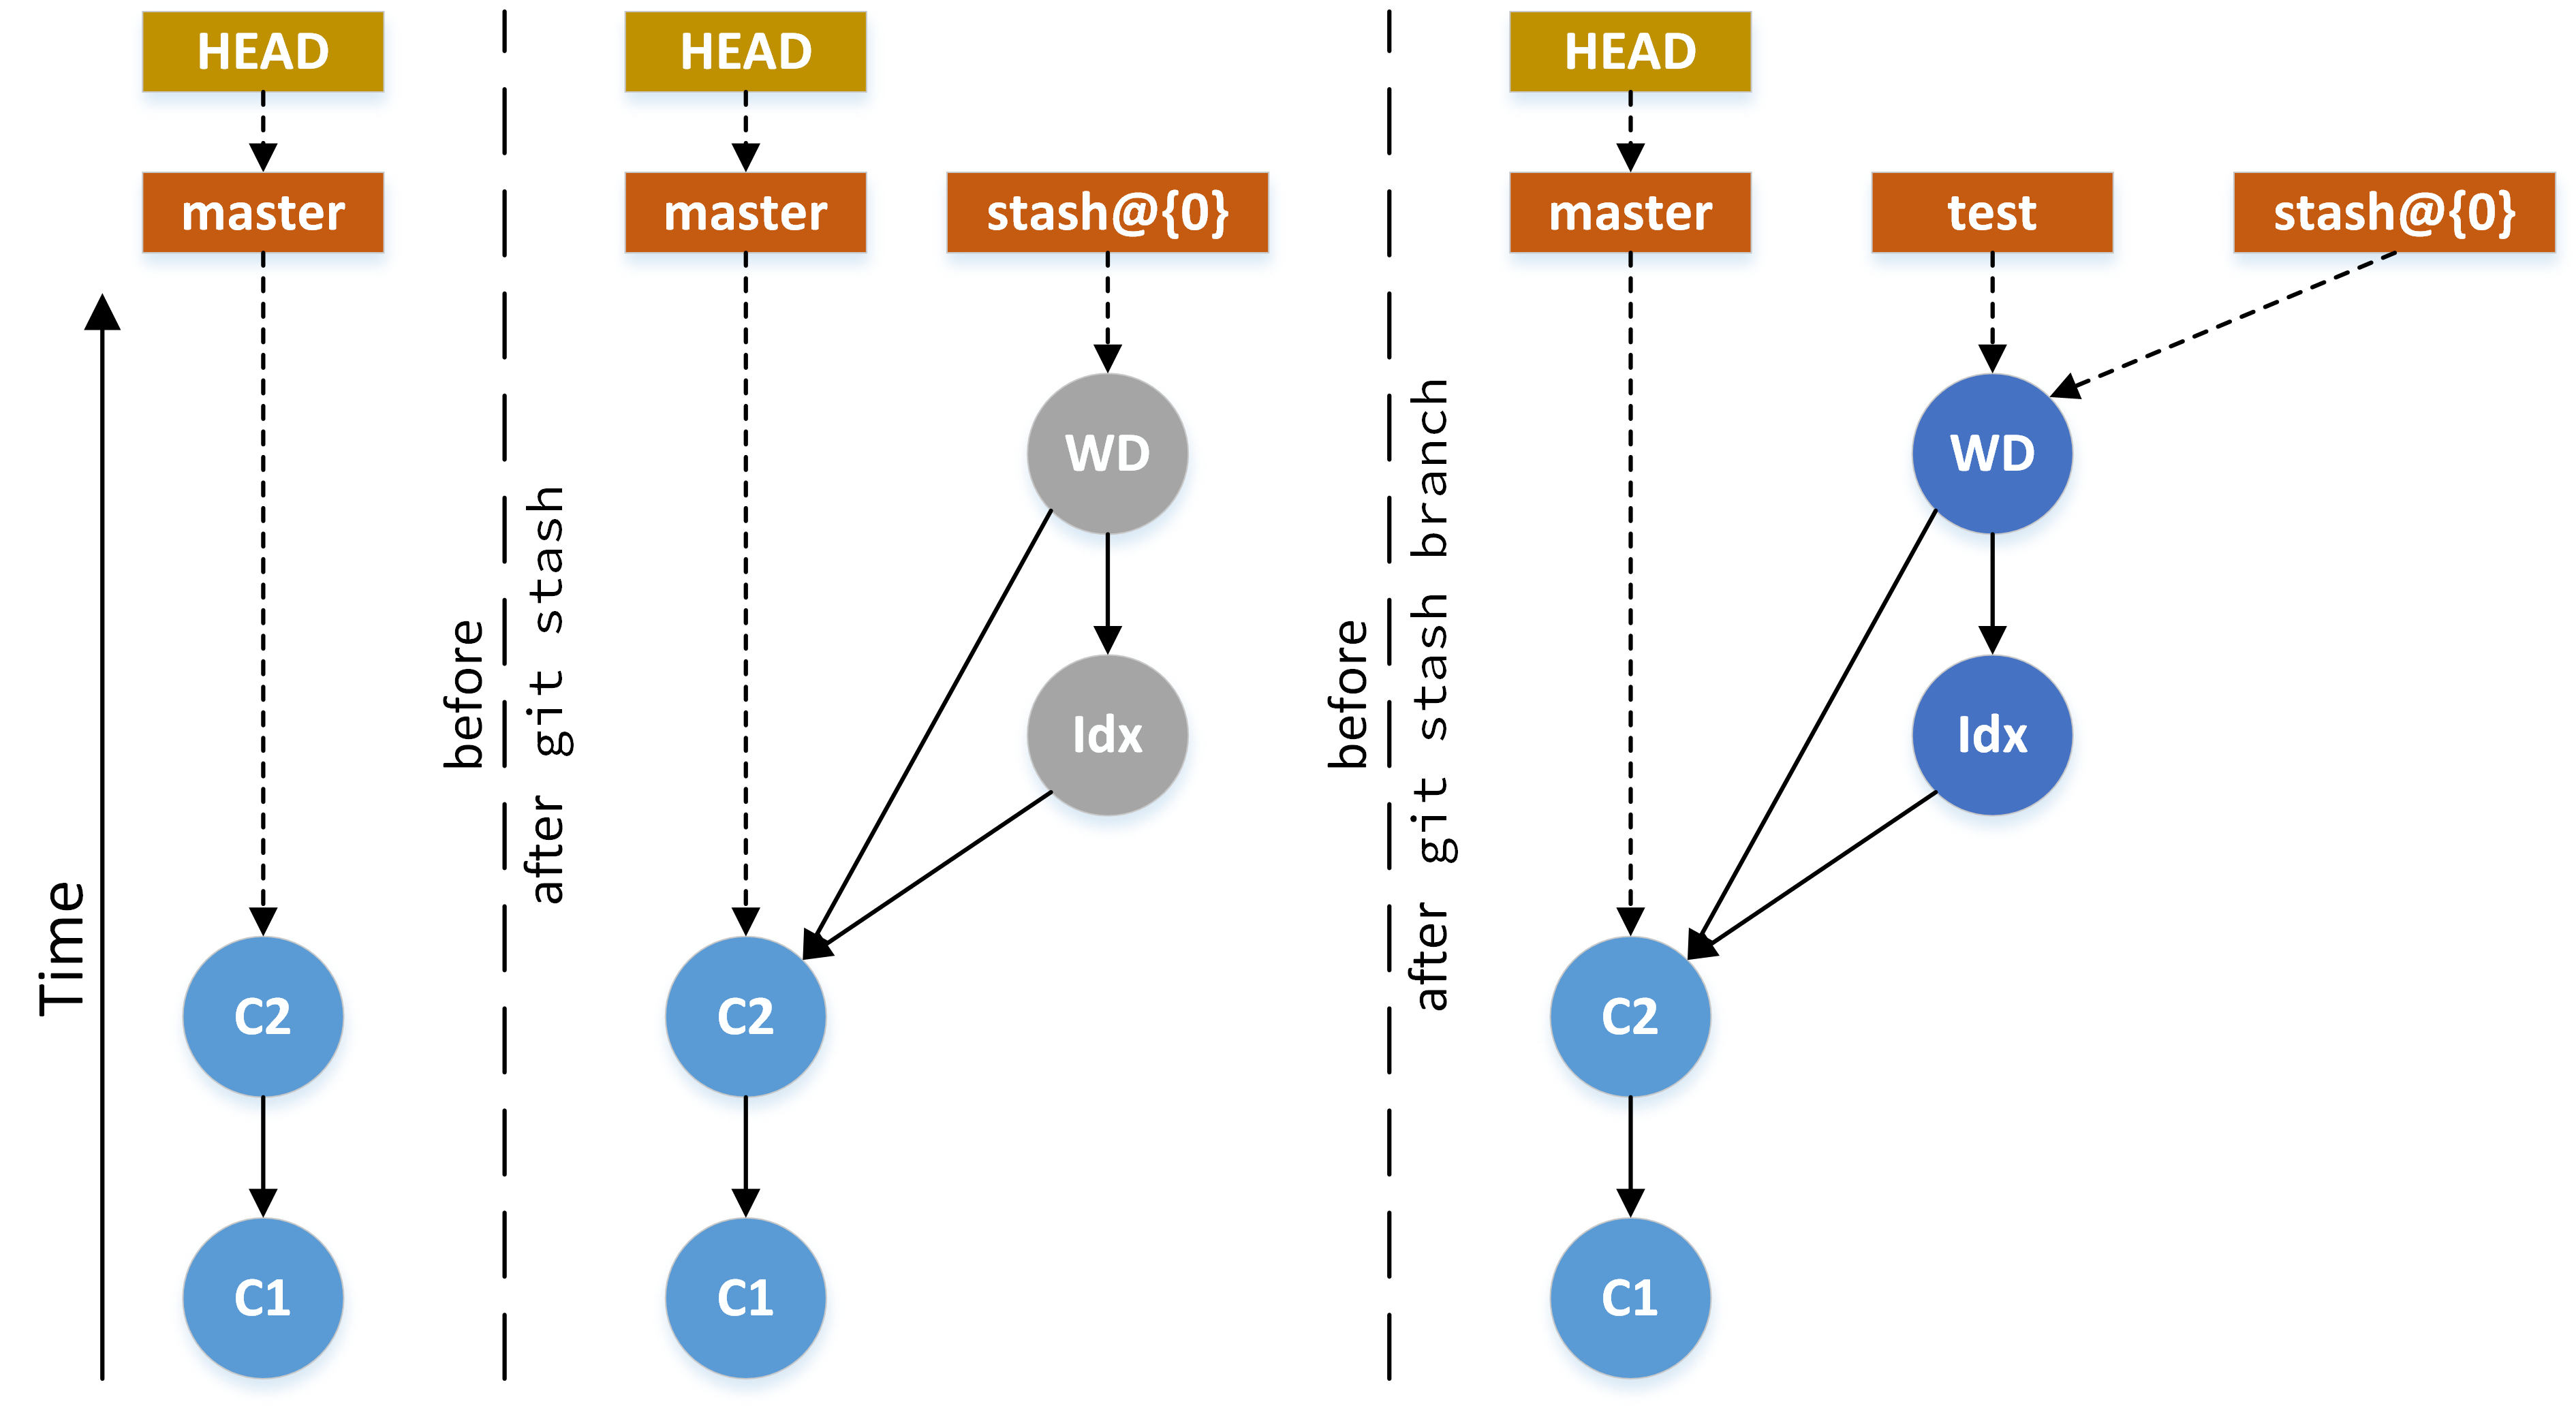
A: One way to avoid mistakenly popping a stash is to use the ‘git stash branch’ command instead. This command creates a new branch and directly applies the stashed changes to it, leaving your current working directory unaffected.
Q: Can I pop multiple stashes at once?
A: Yes, it’s possible to pop multiple stashes simultaneously using the ‘git stash pop stash@{N}’ syntax, where ‘N’ represents the index of the stash. However, if conflicts arise, it’s advisable to handle each stash individually to prevent the loss of any important changes.
Q: Are there any alternatives to ‘git stash’ for temporary code storage?
A: Yes, Git provides other options like ‘git branch temp-branch’ or using regular commit-based version control to save your changes temporarily.
Q: Can I delete a specific stash?
A: Yes, you can delete a stash you no longer need by using the ‘git stash drop stash@{N}’ command, where ‘N’ represents the index of the stash. It’s important to ensure that you no longer need the changes before permanently discarding them.
In conclusion, ‘git stash pop’ can be a powerful tool for temporarily saving changes. However, mistakes can occur, and understanding how to undo a popped stash is crucial. By following the necessary steps, such as identifying the commit hash and creating a new branch based on it, you can recover your changes without losing any important code. Always remember to exercise caution when using Git commands, and be mindful of potential consequences to avoid unnecessary setbacks in your development workflow.
Git Stash Pop Conflict
## Understanding Git Stash Pop Conflict
Git stash stores changes that have been made but not committed on a temporary stack. When the `git stash pop` command is used, the most recent stashed changes are applied to the working directory. This process can result in conflicts if the changes made after stashing conflict with those being applied.
Conflicts generally occur when Git is unable to automatically merge the changes. This can arise due to various reasons, such as modifications in the same lines or conflicting changes in the same region of a file. When a conflict arises, the `git stash pop` command halts execution, allowing the developer to manually resolve the conflict.
## Resolving Git Stash Pop Conflicts
Resolving conflicts during a Git stash pop operation can be accomplished through these steps:
1. Identify the conflicting files: Git will inform you about the files that have conflicts. By running `git status`, you can easily identify the files that need attention.
2. Inspect the conflict markers: Open the conflicting file(s) in an editor, and you will notice conflict markers, indicating the problematic regions. The markers typically look like `<<<<<<<`, `=======`, and `>>>>>>>`. The section between `<<<<<<<` and `=======` shows the original code before the conflict, while the section between `=======` and `>>>>>>>` shows the changes made after the stash.
3. Resolve the conflicts: Carefully review the conflicting regions and make the necessary modifications. Remove the conflict markers and consolidate the conflicting changes into a coherent final version. This process may involve selecting one version over the other, combining both changes, or even rewriting sections of code.
4. Save the changes: After resolving the conflicts, save the file(s) and mark them as resolved. In some cases, executing `git add
5. Continue the stash pop: To resume the `git stash pop` operation, use the command `git stash drop`. This command discards the stash and applies the changes to the working directory.
It is worth noting that unresolved conflicts can prevent the stash from being dropped. In such cases, it’s recommended to use the `–index` flag with the `git stash drop` command, which will remove the stash even if there are unresolved conflicts.
## Frequently Asked Questions
### Q1: Can I use `git stash pop` with uncommitted changes in my working directory?
A: Yes, you can use `git stash pop` even when there are uncommitted changes in your working directory. Git will attempt to apply the stashed changes and may raise conflicts if those changes conflict with the uncommitted modifications.
### Q2: How can I avoid Git stash conflicts?
A: The best way to avoid conflicts during a Git stash pop operation is to ensure that your working directory is clean before applying the stash. Committing or discarding all uncommitted changes will help minimize potential conflicts.
### Q3: What happens if I use `git stash drop` without resolving conflicts?
A: If you try to drop a stash that has unresolved conflicts using `git stash drop`, Git will refuse to discard the stash. In such cases, you can either use the `–index` flag with the command to forcefully remove the stash or resolve the conflicts first and then drop the stash.
### Q4: Can I stash and apply individual files instead of the entire working directory?
A: Yes, you can stash individual files by using the `git stash push
### Q5: Is it possible to stash changes across multiple branches?
A: No, Git stash is specific to the current branch. Stashes cannot be shared or transferred directly between branches.
In conclusion, Git stash pop conflicts can occur when applying stashed changes due to conflicting modifications in the working directory. Developers need to manually resolve these conflicts by identifying the problematic files, inspecting the conflict markers, resolving the conflicts, saving the changes, and then proceeding with the stash pop. By understanding the underlying causes and following the resolution steps, developers can effectively navigate and resolve Git stash pop conflicts, ensuring a smooth version control workflow.
Images related to the topic undo git stash pop
Found 25 images related to undo git stash pop theme







![How to Git Stash [Intermediate Git Tutorial] - YouTube How To Git Stash [Intermediate Git Tutorial] - Youtube](https://i.ytimg.com/vi/fXGug4itlTk/maxresdefault.jpg)









.png)




Article link: undo git stash pop.
Learn more about the topic undo git stash pop.
- Undo git stash pop that results in merge conflict – Stack Overflow
- How to Undo Git Stash Pop Resulting in Merge Conflict
- Undo Git Stash Pop Conflicts | Delft Stack
- How to Undo a Git Stash Pop (Merge Conflict) – Stack Diary
- Undoing accidental git stash pop – GitHub Gist
- git-stash Documentation – Git
- How to Recover a Dropped Stash in Git | Baeldung
- Git stash “lưu lại thay đổi chưa commit” – nhobethoi.com
- Undo options in Git – GitLab Documentation
- Advanced Git, Chapter 3: Stashes – Kodeco
See more: https://nhanvietluanvan.com/luat-hoc